Heat Exchanger Descaling: How To Clean Scale From Brazed Plate Heat Exchangers
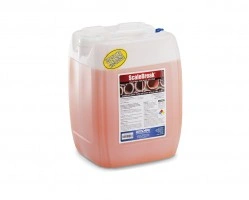
Scalebreak® quickly removes deposits like lime, scale, and rust that otherwise drastically reduce efficiency, increase expenses, and damage vital components.
Step-by-step guide to cleaning heat exchangers
Our comprehensive heat exchanger cleaning guide provides step-by-step instructions to help you achieve optimal results. Start by draining both sides of the exchanger and isolating it from your system fluid using isolation valves. Then, flush water through both sides until it runs clear, following the recommended counter-directional flushing technique. Ensure the efficiency and longevity of your plate heat exchanger with our proven cleaning techniques. See below for more in-depth steps.

Welcome to the sixth installation of Cleaning With ScaleBreak®. This time we are outlining the steps for cleaning brazed plate and gasket heat exchangers with ScaleBreak.
How to clean a brazed plate heat exchanger with a chemical descaler
When cleaning a brazed plate or gasket plate heat exchanger, you will first need to visit our calculation tool at www.goodway.com/resources/calculators#!/heat-exchanger so you know the proper amount of ScaleBreak® needed and how long to perform the circulation. The information in the calculation tool allows you to adjust the amount of ScaleBreak needed based on the sizes of your exchanger.
- Isolate the heat exchanger from the system by closing the supply and return water valves.
- Position a ball valve on the low point of the heat exchanger. This valve will be your entry point for your ScaleBreak cleaning and can be closed to prevent backflow.
- Attach your circulation hoses so you are pumping into the bottom of the heat exchanger and returning the fluid out the top.
- Your exit point on top must be at the exchanger's highest point. If the exit point is lower than the top of the plate pack, position the hose at a higher point. This action will ensure the entire plate pack is flooded and ScaleBreak comes in contact with all the interior wetted surfaces. It will also ensure upper interior areas do not become air-bound with CO2 or foaming resulting from the cleaning.
- Fill your exchanger with water and perform a hydrostatic test by turning your pump on and circulating the water. This action assures the exchanger is isolated and none of the ScaleBreak will be needlessly lost.
- You will need to bleed off enough water equal to the volume of ScaleBreak required for the cleaning. If you relieve too much water, you can add some back to complete your circulation loop.
- Water-formed deposits will occupy volume, as a result, additional water may need to be added during the cleaning duration as deposits are dissolved.
- Periodically check your isolation valves as they may have initially seated against the scale. As ScaleBreak dissolves the scale, this action will help you avoid losing the product.
- Circulate the ScaleBreak solution for the recommended timeframe as indicated by our calculation tool.
- During your ScaleBreak cleaning, you will want to ensure your solution remains active. See how you can tell if your descaler is still active here.
- Once you have reached the recommended circulation time and your ScaleBreak solution has completed the job, you can begin your flushing process.
- Though ScaleBreak is a biodegradable solution, most facilities need to conform to pH discharge limits. ScaleBreak Neutralizer can be utilized to safely elevate your pH to meet your discharge limit so it can be flushed to the drain. Please follow the instructions for this process in the ScaleBreak Neutralizer information sheet.
- To flush your heat exchanger, turn off your circulation pump, remove the return hose from your recirculation system, and put it in a drain.
- Add a freshwater hose to your recirculation bucket on your pump system and turn the pump back on.
- Continue running clean water through the heat exchanger for 10-15 minutes or until the return water is running clear. This action will also flush out your pump system.
- As an added safeguard you can reverse your hoses so you pump into the top and out the bottom. This action will flush away any debris that may have settled out the bottom of the exchanger.
- Disconnect your hoses, close the valves you performed your circulation through and open the valves for the exchanger supply water.
- Your heat exchanger can now be returned to service.
Please note:
- Follow all local regulations for discharge.
- Follow all plant personal protective equipment guidelines as determined by your health & safety team.
- ScaleBreak formulas have very minimal corrosion rates, however, the application of ScaleBreak may reveal pre-existing under-deposit corrosion (UD) or microbiologically induced corrosion (MIC). These types of corrosion can present themselves in the form of pitting, pinholes, or similar types of damage.
Please contact Goodway Technologies with any questions.